Saturday, April 27, 2013

[How to] Read tabs in Linux

How to read tabs in Linux

¿De qué está hablando? Versión en Español

Introduction

One of the reasons I didn't install Linux as my only/main system was that I couldn't read tabs. I found some software that could do it but it wasn't that great.
Until I found Tuxguitar and then I left Guitar Pro behind.

Tuxguitar an OpenSource alternative in Linux

Tuxguitar is a program that can read Guitar Pro tabs (.gp3-.gp5) and PowerTabs too, it may not be as great as the options that are available in Windows or in Mac. Actually I think that is one thing that Linux is missing, all the multimedia software that let you do very cool stuff.
However, because the community is so awesome, you will always find an alternative to any program that you want. If you play any instrument and you want to keep using tabs, Tuxguitar is a great option.

Some screen-shots of this little program:


If you want to install it, all you have to do is:

sudo apt-get install tuxguitar

Playing sound with the Java Library (tuxguitar-jsa)

After you installed Tuxguitar maybe you won't heard any sound.
The easiest way to play sound with Tuxguitar is to use the Java library, in order to do that you have to install the package tuxguitar-jsa. Just run the command:

sudo apt-get install tuxguitar-jsa

Then you need to close the application and open it again. If you still don't hear anything go to "Tools">"Settings">"Sound" and make sure the MIDI port is "Gervill".


Don't like the sound? I don't really like it, that's why I use a MIDI emulator...

TiMidity: MIDI emulador

I wasn't really convinced with the sound of the Java library so I decided to look for other options. If you search the other packages of tuxguitar you may see some interesting options,


but I have tried them all, and I couldn't make them work. The only thing that I could find was TiMidity, it's a MIDI emulador that will play the content of the tab. And it sounds better than tuxguitar-jsa.

To install it use the command:
sudo apt-get install timidity

This time it is not going to be that simple. You need to launch TiMidity from a Terminal with some options.

timidity -iA -Os

After you launched the emulator, some ports are going to open. In my case four ports (129:0 - 129:3)


After you did that go back to Tuxguitar and again go to the Configuration menu ("Tools">"Settings">"Sound"). In "MIDI Port" you need to choose one of the different ports of TiMidity.

Choose the first one and you're ready! Now the sound will be a little more decent.

Did you like this post? Here you can see what I'm going to write about in this blog (for the moment). Don't forget to add me to your G+ circles or follow me on Twitter: @RobertoXMed

[Tutorial] Usar tablaturas en Linux

¿Cómo leer tablaturas en Linux?

What is he talking about? English version

Introducción

Una de las razones por la cual no instalaba definitivamente Linux en mi computador era que no podía leer tablaturas. Encontré uno que otro programa que lo hacía pero nada muy impresionante.
Hasta que encontré Tuxguitar y pues Guitar Pro dejó de ser una opción.

Tuxguitar un lector OpenSource en Linux

Tuxguitar es un programa que lee tablaturas, tal vez no sea tan bueno como las opciones que hay en Windows o Mac. De hecho algo que de verdad le falta a Linux son todos esos programas multimedia que hacen cosas geniales.
Sin embargo como la comunidad es increíble siempre se va a poder encontrar una alternativa a cualquier programa. Si tocan algún instrumento y quieren seguir usando tablaturas Tuxguitar es una gran opción.

He aquí algunas imágenes de cómo se ve este gran programa:


Si desean instalarlo lo único que tienen que hacer es:

sudo apt-get install tuxguitar

Leer tablaturas con la librería de Java (tuxguitar-jsa)

Al principio lo más probable es que no escuchen nada cuando intenten reproducir alguna tablatura.
La manera más simple para poder escuchar algo es usar la librería de sonidos de Java. Solo hay que instalar un paquete tuxguitar-jsa. Para hacer eso:

sudo apt-get install tuxguitar-jsa

Luego reinician la aplicación y deberían poder escuchar algo. Sino vayan a "Tools">"Settings" y en "Sound" asegúrensem de que el puerto MIDI es "Gervill".


¿No les gusta mucho el sonido? A mi no me convence, por eso uso un emulador MIDI...

TiMidity emulador MIDI

Como el sonido no me convencía mucho decidí buscar alguna opción para reproducir el contenido con otra cosa que no sea la librería Java. Si uno busca los diferentes paquetes que hay de Tuxguitar al parecer hay algunas opciones interesantes,


pero las he intentado todas y ninguna me funcionó. Lo único que encontré es TiMidity, es un emulador MIDI que va a reproducir el contenido de la tablatura. Suena mucho mejor que tuxguitar-jsa.

Para instalarlo lo único que tienen que hacer:

sudo apt-get install timidity

Esta vez no va a ser tan simple como con la librería Java. Vamos a tener que lanzar TiMidity desde un terminal con algunas opciones

timidity -iA -Os

Luego de lanzar el emulador se van a abrir algunos puertos, por ejemplo en mi caso se abrieron cuatro (129:0 - 129:3)


Una vez que lanzamos TiMidity volvemos a Tuxguitar y configuramos el reproductor de sonidos (de nuevo en "Tools">"Settings>"Sound"). En "MIDI Port" vamos a tener algunas opciones nuevas, ahí vemos los diferentes puertos que se abrieron con TiMidity.


Seleccionamos el primero y listo! Ahora el sonido debe ser un poco más decente.

Les gustó este post? Aquí pueden ver lo que se va a venir en este blog (por el momento). No se olviden de agregarme a sus círculos en G+ o de seguirme en Twitter: @RobertoXMed

Monday, April 22, 2013

[How to] Root your Android device in Linux

How to root your Android device if you use Linux

¿De qué está hablando? Versión en español

You can adapt this tutorial to your device.

Introduction and motivation


When I was looking for a tutorial that will show me how to root my device in Linux I didn't find a post that will show me exactly how it was going to be, that's why I decided to do this post.

I have a HTC Desire C, which has Ice Cream Sandwich (Android 4.0.3).

First steps


Usually if you bought your device in a retail store, your "Bootloader" should be blocked. The Bootloader is what allows you to install new operating systems in your Android device.

For any HTC device, you need to follow the tutorial in the developer website of HTC. The tutorial explains how to unlock the Bootloader in Windows actually, so I'm going to show you how to do it with your Linux machine:

Go to the HTC site: http://www.htcdev.com and choose "Unlock Bootloader".


After you clicked in "Get Started" you will see a list of devices that are supported. If your device isn't supported you can choose the "All Other Supported Models" option.
Note: you need to create an account in HTCdev, you will receive a mail afterwards with a binary that you will need to unlock the Bootloader. Also you need to accept some conditions.

Now we can see the tutorial made by HTC. Basically we are going to do the same thing but in Linux!! (yeah awesome)
  1. Remove the battery and before you turn ON your device again you need to press the Volume Down Key and then the Power Button. Hold them until your device boots again.
  2. You will see a different screen, and some options will be displayed: "Fastboot", "Recovery", "Factory Reset" and "Simlock". To choose an option you need to use the Volume Keys.
  3. Choose "Fastboot" and press the Power Button.
  4. Plug in your device to your computer. You will see that the title "FASTBOOT" will change to "FASTBOOT USB".

Download the Android tools (adb, fastboot)


For the Ubuntu users: with all the developing that is happening with Ubuntu Touch the "Phablet" team released a PPA in order to download and install adb and fastboot (if your release doesn't have them in the default packages). Just run the following commands:

sudo add-apt-repository ppa:phablet-team/tools
sudo apt-get update
sudo apt-get install android-tools-adb android-tools-fastboot

If you don't use Ubuntu you need to search for the tools in the Google website. Again maybe your distro has uploaded the tools to your packages.

Unlock the Bootloader


Once you have fastboot installed, the next step is to use this command:

sudo fastboot oem get_identifier_token

This will generate a token and the output must look like this:


Then in the tutorial of HTCdev you need to copy (Ctrl + Shift + C in the Terminal) and paste this token in the box of the website.


After you hit the "Submit" button you will receive a mail with a binary that you will execute to unlock the Bootloader.


After you received the mail, you will see a link with the rest of the instructions. Download the attached file "Unlock_code.bin" and put it in a strategic place, "~" (<- your home) seems good to me. Again from a Terminal you use this command:

sudo fastboot flash unlocktoken Unlock_code.bin


Then in your device you will see the following screen. It will ask you if you are sure of what you are doing. After you select "Yes" your phone will have its Bootloader unlocked.

Note: if you want to lock the Bootloader again, just use:
 
sudo fastboot oem lock

Downloading the super user


The next step is to download the super user, this little program will give you all the privileges in your Android device, that way you can do whatever you want with your phone. For example you can erase all the apps that you don't want but that are installed by default. Or you can install a new ROM into your phone.

You need to go to this website and download the file "Superboot r1".

Put the file where you want and extract it, you need to give the permission to execute the script:

chmod +x install-superboot-linux.sh

Then you need to plug in your phone, again in "FASTBOOT USB" mode.
You can do that without removing the battery with abd. But your device has to have the USB Debugging option activated. Go to "Settings">"Developer options"


sudo adb reboot-bootloader


Install the super user


Once your phone is connected and after you are in the good folder in your terminal, you will just need to run the script:

sudo ./install-superboot-linux.sh

Once you did that your phone will restart and the super user (SU) will be installed.

Did you like this post? Here you can see what I'm going to write about in this blog (for the moment). Don't forget to add me to your G+ circles or follow me on Twitter: @RobertoXMed

[Tutorial] Cómo rootear su Android en Linux

Cómo rootear su Android si usan Linux

What is he talking about? English version

Introducción e interés


Buscando tutoriales sobre como rootear mi teléfono en Linux no encontré nada muy claro ni muy gráfico entonces he decidido hacer este tutorial.

Yo utilizo un HTC Desire C, vino con Ice Cream Sandwich (versión 4.0.3 de Android).

Primeros pasos


Normalmente cada dispositivo tiene su "Bootloader" bloqueado. El Bootloader es lo que permite instalar un nuevo sistema operativo en su Android.

En el caso de los dispositivos HTC lo que tienen que hacer es seguir el tutorial en la página de desarroladores de HTC. Como el tutorial está más centrado para gente que usa Windows aquí les mostraré lo que tienen que hacer:

Vayan al sitio de HTC: http://www.htcdev.com y elijan "Unlock Bootloader".


Luego de clikear en "Get Started" van a tener una lista de dispositivos a su derecha. Si su dispositivo no está en la lista van a tener que elejir "All Other Supported Models".

Nota: tienen que crear una cuenta en HTCdev porque luego van a recibir un mail con un código que les va a servir para desbloquear el "Bootloader". Así mismo tienen que aceptar algunas condiciones en las cuales dicen que saben lo que están haciendo.

Luego llegamos al tutorial de HTC. Básicamente vamos a hacer lo mismo que está en el tutorial pero solo les diré cómo hacerlo en Linux y no en Windows.
  1. Saquen la batería y cuando vayan a prenderlo de nuevo deben aplastar el botón del volumen hacia abajo y el botón de encendido al mismo tiempo. (Pueden aplastar el volumen hacia abajo primero y luego el botón de encendido).
  2. Cuando su teléfono se va a encender van a ver una pantalla en la que tienen algunas opciones: "Fastboot", "Recovery", "Factory Reset" y "Simlock". Para navegar en este menú deben utilizar los botones de volumen.
  3. Seleccionan "Fastboot" luego aplastan en el botón de encendido.
  4. Conecten su dispositvo al computador. Una vez que lo hicieron el título debe cambiar a "FASTBOOT USB".

Descargar los utilitarios (adb, fastboot)


Para los usuarios de Ubuntu: con todo el desarrollo que se está dando a causa de Ubuntu Touch para los teléfonos se ha creado un PPA del cual pueden descargar e instalar abd y fastboot (si estos no están en los paquetes). Solo usen los comandos siguientes.

sudo add-apt-repository ppa:phablet-team/tools
sudo apt-get update
sudo apt-get install android-tools-adb android-tools-fastboot

Si no usan Ubuntu deben ir a la página de Google y descargar estos dos utilitarios para Linux (si estas herramientas no están en los paquetes de su distribución).

Desbloquear el Bootloader


Una vez que tengan instalado fastboot el siguiente paso es usar este comando para que fastboot nos genere un código:

sudo fastboot oem get_identifier_token

Les va a salir un mensaje como este:


Luego ese código deben introducirlo en una casilla de los pasos que están en la página de HTC con el tutorial sobre cómo desbloquear el bootloader.


Una vez que le den click en "Submit" van a recibir un mail con un script que van a ejecutarlo y así su teléfono se desbloqueará.


Después de que recibieron el mail, van a ver que en él hay lo que sigue de las instrucciones. Descargamos el archivo adjunto  que se llama "Unlock_code.bin" en un lugar fácil de encontrar por ejemplo en "~" (<- eso es su home). De nuevo desde el terminal vamos a usar el comando siguiente:

sudo fastboot flash unlocktoken Unlock_code.bin


Y luego en su teléfono van a ver la pantalla siguiente que les preguntará si están seguros de que quieren desbloquear el Bootloader. Seleccionan "Yes" y listo. Su teléfono debe reiniciarse.


Nota: si quieren bloquear el bootloader de nuevo lo único que tienen que hacer es:

sudo fastboot oem lock

Descargar el super utilizador (super user)


El siguiente paso es descargar el super utilizador, es lo que les va a dar todos los derechos en su Android y así podrán hacer lo quieran con su dispositivo. Como por ejemplo eliminar todas las aplicaciones que no les sirven de nada y que ocupan mucho espacio. O pueden instalar un nuevo ROM en su teléfono.

Para eso deben ir a esta página y descargar el archivo "Superboot r1".

Lo ponen donde quieran en su computador, lo extraen y deben darle el permiso para ejecutarse:

chmod +x install-superboot-linux.sh

Luego deben volver a conectar su teléfono prendiéndolo como al principio, es decir con "FASTBOOT USB".
Pueden hacer esto usando adb. Pero antes deben activar el modo depuración USB, yendo a "Ajustes">"Opciones de desarrollo":


sudo adb reboot-bootloader


Instalar el super utilizador


Una vez que su teléfono está conectado y en su terminal están en la buena carpeta (donde pusieron el instalador del súper utilizador), lo único que les resta hacer es lo siguiente:

sudo ./install-superboot-linux.sh

Una vez que hicieron esto su teléfono va a reiniciarse y tendrán instalado el súper utilizador (SU).

Les gustó este post? Aquí pueden ver lo que se va a venir en este blog (por el momento). No se olviden de agregarme a sus círculos en G+ o de seguirme en Twitter: @RobertoXMed

Wednesday, April 17, 2013

[How to] Install Linux using partitions

Install Ubuntu (Linux) using partions

De qué está hablando? Versión en español

You can apply this tutorial to almost every distribution that you like. I have used this principle with openSUSE, LinuxMint, Arch Linux and almost any Linux distribution.
 

Motivation and interest


Why would I install Ubuntu using partitions? If the only thing I need to do is to let the manager do the work for me.

Well, when I started using Linux I let the installer of my distro do all the installation for me. Which is very convenient, specially if you are just trying out new operating systems.

But if you are like me, from time to time you like to test a new kernel or a new driver or packages that you aren't sure that are going to work. This could crash your system and make it unbootable. That's why you may be interested in this little article.

The idea behind this post is to show you how useful it can be to use a partition table when you install your distro.
Where are going to mount three different partitions: "/home" (where all your personal data is saved), "/" (the root, where the actual system is installed) and the swap partition. (You can make more partitions like mounting /boot in another space in the disk, but I think three are just enough).

Partition table


When you are installing Ubuntu again, instead of choosing the "Erase disk and install Ubuntu" option you should choose "Something else".

In Ubuntu 12.10
In Ubuntu 12.04

Once you're in the next window you are going to see your hard drive. There might be some partitions or just one. I recommend you to do a clean installation and delete all the partitions using the button "-". If you are using a new hard drive you need to choose the option "New Partition Table...".


Now we can start making our different partitions.

Swap area

First of all we are going to do the swap partition. This will depend on how much RAM memory you have in your computer. Normally this partition has to be at least the same size as your RAM. But it's recommended that it is the double of capacity than your RAM, in order to have a "good" partition.

What does swap do?
 
When you run out of memory in you RAM, because you have too many programs running, the system is going to put some of this processes in the hard-drive. Then when your computer will need some of the processes that are in your hard-drive, it will load them into the RAM again. If you have a big RAM memory (like 8GB for example) maybe you haven't used swap at all. But if you plan to put your computer into hibernation mode, your session is going to be saved in the swap partition. That's why resuming from hibernation takes more time.

Click in the "+" button. Once the new window pop up you choose the size of the partition (In this example it's about 4GB). Then in the section "Use as:" we choose the option "swap area". And then just click in "OK".


Now we are going to prepare the / [root] partition.

/ (root)

In this case you choose the size that you judge convenient. In my computer I have a 10GB partition. But if you want to install a lot of software maybe you should try a 20GB partition, it really depends on you. I think the minimum is 3GB.

In this example I am using a virtual machine, so the space I am giving to this partition is very small.

Click again in the "+" button, after you select "free space". Then we are going to create the new partition: it's a "Primary" partition and we are going to use Ext4 journaling file system. Here is the important part: when you select your "Mount point" you need to choose the "/" option. And that's all.


/home

We can use the rest of the free space to store all your personal data. Many folders are going to be saved in your /home. Some of them are your configuration files for all your programs like Firefox, Thunderbird, SSH, etc... You can't see them because they are hidden. In Nautilus you can do Crtl + H to show hidden files. Or if you are in a Terminal use ls -a.

Like with the root partition we are going to use Ext4. The type of the partition is going to be "Logical" and the "Mount Point" is going to be "/home".
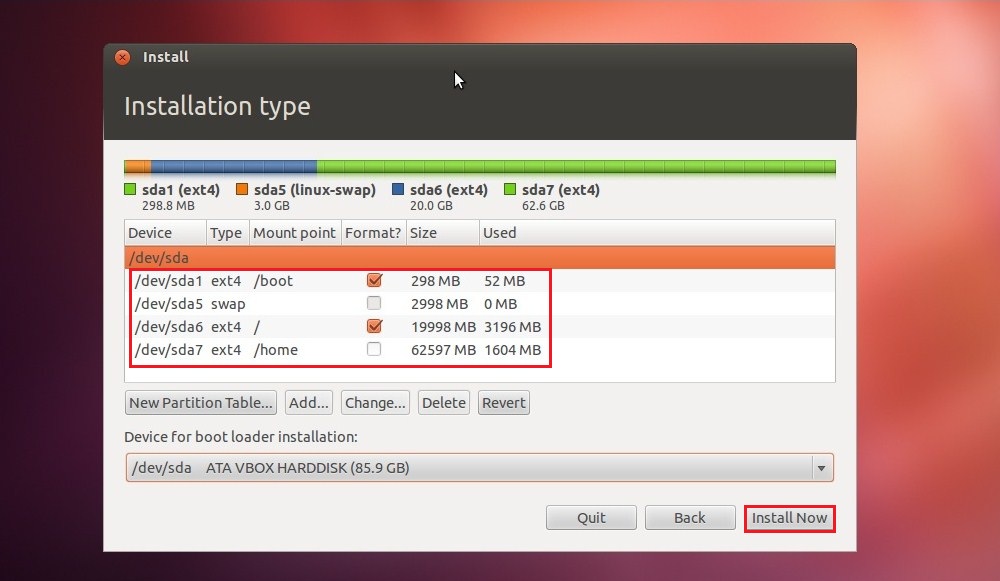

Before we finish

Don't forget to double check if your partitions are ok. Your partition table should look like the one in this example. After you check everything just click in "Install Now".


If you have a new computer with UEFI

You are going to need another partition. It is an efi partition and without it you are not going to be able to boot in Ubuntu. I haven't try this myself because my only computer doesn't have this functionality (and apparently it saved me a lot of troubles).
The partition has to be around 40MB, but you could give it like 250MB to be sure. Then when you select the "Use as" option, make sure you choose "efi boot".


There you have it. How to install your system using partitions. That was simple, right? Now I will explain you why this is so convenient.

Recover your system


Let's suppose like for some strange reason (you installed a new driver, you tried something dangerous, ...) your system isn't able to boot anymore.

Partitions are going to save you a lot of time.
 
Boot your system using a LiveCD or an USB key.

Choose again "Install Ubuntu" and choose "Something else".

En Ubuntu 12.10
En Ubuntu 12.04
The difference is that now, you are going to see all the partitions that you made before.
You need to repeat the steps we did before: choosing your swap, / and /home. Make sure you are using the same disk space for every partition and that you set it up like you did the first time.

But here is the difference: there is an option that says "Format?". Here we are going to make sure that this option isn't enable for the /home partition. Unmark that option. We need to format the / (root) partition because the system needs to be installed again.


And that's it! You install your system again without loosing your personal data. You are going to loose all the programs that you installed but well, you can check my other tutorial with the top things to do after installing Ubuntu 12.04/12.10 to make your computer run smoothly again.

Did you like this post? Here you can see what I'm going to write about in this blog (for the moment). Don't forget to add me to your circles in G+ or to follow me in Twitter: @RobertoXMed