Showing posts with label howto. Show all posts

Wednesday, April 17, 2013

[How to] Install Linux using partitions

Install Ubuntu (Linux) using partions

De qué está hablando? Versión en español

You can apply this tutorial to almost every distribution that you like. I have used this principle with openSUSE, LinuxMint, Arch Linux and almost any Linux distribution.
 

Motivation and interest


Why would I install Ubuntu using partitions? If the only thing I need to do is to let the manager do the work for me.

Well, when I started using Linux I let the installer of my distro do all the installation for me. Which is very convenient, specially if you are just trying out new operating systems.

But if you are like me, from time to time you like to test a new kernel or a new driver or packages that you aren't sure that are going to work. This could crash your system and make it unbootable. That's why you may be interested in this little article.

The idea behind this post is to show you how useful it can be to use a partition table when you install your distro.
Where are going to mount three different partitions: "/home" (where all your personal data is saved), "/" (the root, where the actual system is installed) and the swap partition. (You can make more partitions like mounting /boot in another space in the disk, but I think three are just enough).

Partition table


When you are installing Ubuntu again, instead of choosing the "Erase disk and install Ubuntu" option you should choose "Something else".

In Ubuntu 12.10
In Ubuntu 12.04

Once you're in the next window you are going to see your hard drive. There might be some partitions or just one. I recommend you to do a clean installation and delete all the partitions using the button "-". If you are using a new hard drive you need to choose the option "New Partition Table...".


Now we can start making our different partitions.

Swap area

First of all we are going to do the swap partition. This will depend on how much RAM memory you have in your computer. Normally this partition has to be at least the same size as your RAM. But it's recommended that it is the double of capacity than your RAM, in order to have a "good" partition.

What does swap do?
 
When you run out of memory in you RAM, because you have too many programs running, the system is going to put some of this processes in the hard-drive. Then when your computer will need some of the processes that are in your hard-drive, it will load them into the RAM again. If you have a big RAM memory (like 8GB for example) maybe you haven't used swap at all. But if you plan to put your computer into hibernation mode, your session is going to be saved in the swap partition. That's why resuming from hibernation takes more time.

Click in the "+" button. Once the new window pop up you choose the size of the partition (In this example it's about 4GB). Then in the section "Use as:" we choose the option "swap area". And then just click in "OK".


Now we are going to prepare the / [root] partition.

/ (root)

In this case you choose the size that you judge convenient. In my computer I have a 10GB partition. But if you want to install a lot of software maybe you should try a 20GB partition, it really depends on you. I think the minimum is 3GB.

In this example I am using a virtual machine, so the space I am giving to this partition is very small.

Click again in the "+" button, after you select "free space". Then we are going to create the new partition: it's a "Primary" partition and we are going to use Ext4 journaling file system. Here is the important part: when you select your "Mount point" you need to choose the "/" option. And that's all.


/home

We can use the rest of the free space to store all your personal data. Many folders are going to be saved in your /home. Some of them are your configuration files for all your programs like Firefox, Thunderbird, SSH, etc... You can't see them because they are hidden. In Nautilus you can do Crtl + H to show hidden files. Or if you are in a Terminal use ls -a.

Like with the root partition we are going to use Ext4. The type of the partition is going to be "Logical" and the "Mount Point" is going to be "/home".


Before we finish

Don't forget to double check if your partitions are ok. Your partition table should look like the one in this example. After you check everything just click in "Install Now".


If you have a new computer with UEFI

You are going to need another partition. It is an efi partition and without it you are not going to be able to boot in Ubuntu. I haven't try this myself because my only computer doesn't have this functionality (and apparently it saved me a lot of troubles).
The partition has to be around 40MB, but you could give it like 250MB to be sure. Then when you select the "Use as" option, make sure you choose "efi boot".


There you have it. How to install your system using partitions. That was simple, right? Now I will explain you why this is so convenient.

Recover your system


Let's suppose like for some strange reason (you installed a new driver, you tried something dangerous, ...) your system isn't able to boot anymore.

Partitions are going to save you a lot of time.
 
Boot your system using a LiveCD or an USB key.

Choose again "Install Ubuntu" and choose "Something else".

En Ubuntu 12.10
En Ubuntu 12.04
The difference is that now, you are going to see all the partitions that you made before.
You need to repeat the steps we did before: choosing your swap, / and /home. Make sure you are using the same disk space for every partition and that you set it up like you did the first time.

But here is the difference: there is an option that says "Format?". Here we are going to make sure that this option isn't enable for the /home partition. Unmark that option. We need to format the / (root) partition because the system needs to be installed again.
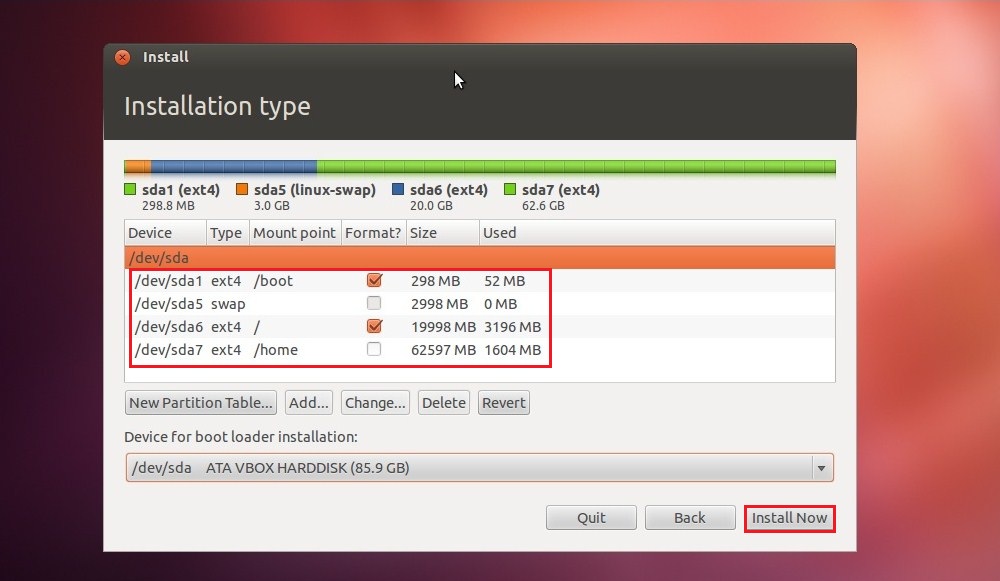


And that's it! You install your system again without loosing your personal data. You are going to loose all the programs that you installed but well, you can check my other tutorial with the top things to do after installing Ubuntu 12.04/12.10 to make your computer run smoothly again.

Did you like this post? Here you can see what I'm going to write about in this blog (for the moment). Don't forget to add me to your circles in G+ or to follow me in Twitter: @RobertoXMed

Thursday, April 11, 2013

[To do] Top things to do after installing Ubuntu 12.04/12.10

Top things to do after installing Ubuntu 12.04/12.10

¿De qué está hablando? Versión en español
Did this post help you? Maybe you can invite me some coffee :)
Donate Button

So I installed Ubuntu, what now?

In this post I will show the top things that I recommend you to do in order to make your computer run like a champ.
I strongly recommend the use of the (a) Terminal except in a few cases, like when you first update, you should update with the "Update Manager" because you'll have to install new kernel revisions.

Updating packages and upgrading

The firs thing that you absolutely want to do, just after installing Ubuntu is to update your packages. To do this, you will need to search for the "Update Manager" in the application list.


Then you click in "Check"and after all the packages are updated you can "Install Updates"


Or you could launch a Terminal and put the following command:

sudo apt-get update && sudo apt-get upgrade

The first time you do this it could take a lot of time.

Installing proprietary drivers

If your computer has a graphic card like nVidia or AMD or a wireless connexion you must install some drivers to make it work properly. If your wireless doesn't work you might want to install the driver using a wired connexion.


After searching for "Additional Drivers" you choose the driver you want to activate and restart your computer afterwards.


If you're using Ubuntu 12.10, this procedure is a little different. First you have to go to "Software Sources", you can access them from the "Ubuntu Software Center" too. Then you can see there is a tab with "Additional Driver"


Enabling proprietary packages and installing proprietary software

If you want to install some proprietary packages like libraries to play MP3, or to install software developed by Microsoft, like Skype, you have to active some repositories in the "Software Sources". You open the "Ubuntu Software Center" and in the Menu "Edit" you open the "Software Sources" window


 Then you click in tab "Other Software" and choose the option "Independent":

Medibuntu

For legal reasons Ubuntu is not allowed to include some codecs, fonts, software automatically. You have to enable Medibuntu packages. You just use this command for doing that:

sudo -E wget --output-document=/etc/apt/sources.list.d/medibuntu.list http://www.medibuntu.org/sources.list.d/$(lsb_release -cs).list && sudo apt-get --quiet update && sudo apt-get --yes --quiet --allow-unauthenticated install medibuntu-keyring && sudo apt-get --quiet update

That way you can have access to all (or almost) the propietary packages that you may want/have to use

sudo apt-get install app-install-data-medibuntu apport-hooks-medibuntu

Privacy in Ubuntu 12.10

Don't forget about setting up your privacy if you're running 12.10. If you don't want Unity to send your search into Amazon go to "System Settings", then "Privacy" and turn off/on what you want.


I don't like Unity, show me something else

Many people don't like Unity for many reasons and prefer to change the desktop. Or maybe if you just want to 

Gnome 2: or "Oh I miss the old days". If you want to go back to Gnome 2 just type this command:

sudo apt-get install gnome-panel


Gnome 3: the Gnome team recently released version 3.8 which many people seem to like. And let's admit that New is always better... Maybe not...

sudo add-apt-repository ppa:gnome3-team/gnome3
sudo apt-get update
sudo apt-get install gnome-shell


KDE 4: the KDE recently released version 4.10.2, this desktop is my second choice after Unity. I used it for a while and is fast, stable and the graphics with OpenGL are sick. With this command you're actually changing the flavor of your Ubuntu to add Kubuntu:

sudo add-apt-repository ppa:kubuntu-ppa/backports
sudo apt-get update
sudo apt-get install kubuntu-desktop


Cinnamon: it started as a fork of Gnome 2. Very interesting and pretty nice too.

sudo add-apt-repository ppa:gwendal-lebihan-dev/cinnamon-stable
sudo apt-get update
sudo apt-get install cinnamon


There are many other options out there in the wild but I haven't given them a long try. Here are some examples: XFCE, LXDE, Awesome, Xmonad, MATE... among others.

I like Unity,  but I want to tweak it a little bit

If, like me you're just used to use Unity there are some programs that let you tweak this desktop

MyUnity

A very simple program that is included in the packages of Ubuntu, there's no need to use a PPA and has everything you may want.

sudo apt-get install myunity


Ubuntu Tweak 

Another tool very interesting to modify Unity is Ubuntu Tweak. To install it:

sudo add-apt-repository ppa:tualatrix/ppa
sudo apt-get update
sudo apt-get install ubuntu-tweak


Internet


Google Chrome o Chromium: if you don't like Firefox you can install Google Chrome by going to their download page.
After you installed the right package for your distribution you can use this command (adapt it with the name of your package:

sudo dpkg -i google-chrome-stable_current_amd64.deb

or you could just open the folder where you save the file and double-click it. But the command line is more fun, let's admit it.

If you want to install Chromium instead:

sudo apt-get install chromium-browser

Transmission

If you want to download some files from the Internet using a Bit Torrent client there is one installed by default with Ubuntu. Transmission is a light-weight bit torrent client that will do just the job. You can set it up as you want but it doesn't have a lot of options.


There are many options for Linux, like KTorrent, Deluge...

Geary

If you want to install another client for your e-mail I think you could try to install Geary. Here is how it looks:


To install it:

sudo add-apt-repository ppa:yorba/ppa
sudo apt-get update
sudo apt-get install geary

Multimedia

There are some interesting programs to play multimedia, audio, video... But before doing some installation we want to make sure that we have the right codecs intalled.

sudo apt-get install non-free-codecs libxine1-ffmpeg gxine mencoder totem-mozilla icedax tagtool easytag id3tool lame nautilus-script-audio-convert libmad0

A frequent problem you find in different forums is how to play DVDs in Ubuntu/Linux. DVDs use a special encryption protocol, you have to install a library for decryption, run this command that will install this library and execute a configuration file:

sudo apt-get install libdvdcss2 && sudo /usr/share/doc/libdvdread4/./install-css.sh

VLC


VLC is a great media player that can read EVERYTHING, and I really mean it.

sudo apt-get install vlc

 Clementine

If you're looking for an alternative to Rhythmbox because you don't like or if you miss some functionalities like an equalizer or a little more personalization; Clementine is a great option. For installing this player:

sudo add-apt-repository ppa:me-davidsansome/clementine
sudo apt-get update
sudo apt-get install clementine


Just heard Steam came for Linux?

That's right boy, Steam launched its client for Linux a few months ago and it looks pretty awesome.
If you want to install it you have to go to their page and download the .deb . After you do that run this command (no matter if you're using a 32 or 64 bit computer):

sudo dpkg -i steam_latest.deb

If you run into some dependency errors you need to run this command in order to install the missing packages

sudo apt-get install -f

Then Steam will update and ask you to install the last packages it needs. You'll just have to put your password and you're good to go.
This is how it looks, pretty sweet if you ask me:


Messenger

Pidgin

I have tried Empathy but I had some troubles with my MSN account. Pidgin is a great alternative and it supports many protocols, like MSN, Facebook, Google Talk...

sudo apt-get install pidgin

Skype

In order to install Skype in Ubuntu you have to install the independent packages  as seen at the beginning of this blog.

sudo apt-get install skype


If you're using Skype and Unity give Skype Wrapper a try, it will integrate Skype to Unity. Here are some examples of what it will do:


sudo add-apt-repository ppa:skype-wrapper/ppa
sudo apt-get update
sudo apt-get install skype-wrapper

If you want to see the changes you need to Log out first.

Cloud and backup

Dropbox

Most people have a cloud account with some server. You can share files, make a backups in the cloud, or just have your files available from anywhere you want. You have to go to the download page and again you can run this command (adapting it to your distribution):

sudo dpkg -i dropbox_1.4.0_amd64.deb

Deja-dup

Something that I love about Ubuntu (and other distros) is that they have their own backup manager. You can setup your backups to put them in the Cloud or in a FTP server or simply put it in a hard drive.
You search in your applications for "Backup"  and then you can configure
your backup as you like.


Ubuntu One

Ubuntu offers a 5GB account for every Ubuntu installation. You can synchronize any file you want with this.


Some tools and indicators for your system

Jupiter

An interesting tool that allows you to save some energy of your laptop. It also indicates you the state of the computer.

sudo add-apt-repository ppa:webupd8team/jupiter
sudo apt-get update
sudo apt-get install jupiter

System indicator

This allows you to see many stats, like your processor performance, your network connexion, your RAM charge, I/O of your disk...


sudo apt-get install indicator-multiload


Wheater

There is an interesting indicator if you want to check the weather (although I have had some issues with it, when it works it's nice):

sudo apt-get install indicator-weather

I still need some Windows programs

Wine

If you need to install some Windows software that isn't available for Linux you can use Wine emulator. It is not going to work for everything but you can do a lot of stuff like installing Microsoft Office.


sudo apt-get install wine


Virtual Box

If Wine doesn't work you may want to create a virtual machine and install some programs in it. The problem is that you must have a Windows ISO.
Download the package from Oracle's site and again from the terminal (adapting it to your own):

sudo dpkg -i virtualbox-4.2_4.2.10-84104~Ubuntu~precise_amd64.deb

Programming (a.k.a "Why don't you compile?")

For people who use their machine for writing code, here is a list that you use for installing some basic packages for programming:

Essentials

First of all you want to install some basic packages that allows you to compile, this packages include gcc for example

sudo apt-get install build-essential

¿gcc is too old school?

Clang is a great compiler for C and C++, it has the same syntax that gcc but it has a nice output:

sudo apt-get install clang

Geany


A simple IDE that recognizes some languages.

sudo apt-get install geany

Eclipse

For programming with Java the only thing that you need to do (because it will install Java at the same time) is install Eclipse.

sudo apt-get install eclipse

OpenGL

If you're planning to do some programming using OpenGL you must install the "freeglut" package:

sudo apt-get install freeglut3-dev

Cleaning everything that you wont use anymore


After you're done installing everything that you always wanted run this commands to clean your packages and to uninstall everything that you don't need anymore:

sudo apt-get autoremove
sudo apt-get autoclean

And you're good to go. Enjoy your new install!

Did you like this post? Here is what you can expect from my blog. Don't forget to add me to your circles in G+ or to follow me on Twitter: @RobertoXMed

Tuesday, April 9, 2013

[Info] Temas por venir en el blog. Topics to come in this blog

Temas que planeo tratar en los próximos días/semanas

Bueno el título está bien claro creo. En todo caso estas son las ideas que tengo por el momento. Algo muy práctico en Blogspot es que pueden subscribirse al canal RSS, así apenas publique algo pueden verlo enseguida. No hay un orden específico a esto pero creo que no es mala idea comenzar con el último post.

[Tutorial / Discusión] Particiones en Linux y porqué usarlas

[Tutorial] Cambiar el color del prompt en el terminal

[Tutorial] Instalar Sublime Text 2, un editor de texto muy simpático

[Reseña]  Shutter, para hacer capturas un poco más específicas de su pantalla

[Tutorial] Leer tablaturas en Linux con Tuxguitar

[Reseña] Steam para Linux

[Tutorial] ¿Qué hacer luego de instalar Ubuntu 12.04/12.10?

...

Topics that I plan to talk about in the next few days.

Well the title explains for itself a little bit. Anyway this are the ideas that I have for the moment. Don't forget to subscribe to RSS channel, that way you can read my posts as soon as I post them! I think it wouldn't be a bad idea to start with the last post.

[How to / Discussion] Partitions in Linux and why I should use them

[How to] Change the color of your prompt for your shell

[How to] Install Sublime Text 2, a nice text editor

[Review]  Shutter, let's you make more specific captures of your screen

[How to] Read tabs (*.gp3,4,5) in Linux with Tuxguitar

[Review] Steam for Linux

[To do] Top things to do after installing Ubuntu 12.04/12.10

...

Monday, April 8, 2013

[Tutorial] Mejorar el rendimiento de un SSD en Ubuntu

Antes de comenzar

La mayoría de estos cambios necesitan el uso del Terminal. Así mismo la mayoría de cambios van a permitir que el computador escriba menos seguido en el disco. De este modo nuestro SSD va a durar más tiempo.

Activar el soporte TRIM

Vamos a tener que editar el archivo fstab. Para eso vamos a abrir un terminal y escribimos lo siguiente:

sudo cp /etc/fstab /etc/fstab.bak

Esto nos va a permitir hacer un respaldo en caso de que escribamos mal alguna de las opciones. Luego desde el mismo terminal vamos a abrir un editor de texto (yo uso nano porque no tenemos que escribir muchas cosas, pueden usar gedit, o lo que más les guste):

sudo nano /etc/fstab

Vamos a llegar a una pantalla que se parece más o menos a esto:


Ya podemos ver las opciones que vamos a introducir en este archivo.

Su fstab puede ser diferente al mío dependiendo de las particiones que utilicen.

En el caso general uds. van a tener solo un par de particiones una para el swap y otra para todo su sistema. En todo caso al lado de donde diga "ext4" o cualquier tipo de gestión de archivos que utilicen van a introducir las palabras:

discard,noatime,nodiratime

Y listo así podrán activar el soporte TRIM para su SSD.

Para usar la RAM como memoria para los archivos temporales


En el mismo archivo fstab vamos a poder decirle al sistema que guarde todos los archivos temporales en la RAM, estos se perderan si apagamos nuestra máquina o si la ponemos en hibernación. Me parece muy útil ya que no utilizo los archivos temporales luego de apagar mi máquina y así evito escrituras innecesarias en mi disco duro.

Introducimos la líneas siguiente:

tmpfs /tmp tmpfs defaults,noatime,mode=1777 0 0

Listo, para que los cambios tengan efecto hay que reiniciar el computador. Pero antes hay otros cambios que podemos hacer.

Ultimos cambios


Existen tres tipos de "calendarios" que utiliza el sistema para escribir en el disco: deadline, noop, cfq. El último es el que se utiliza por defecto en una nueva instalación pero no es muy recomendable para los SSDs ya que usan mucho el disco.

Podemos verificar que tipo estamos usando con el comando siguiente:

cat /sys/block/sda/queue/scheduler

Dependiendo de como usen su disco, es decir si usan otros discos duros puede que necesiten cambiar el comando usando "sdb" en vez de "sda" o "sdc", etc...

Una vez que hicimos eso, vamos a ver una línea como esta:

noop deadline [cfq]

Vamos a volver a tener que cambiar un archivo para poder utilizar uno de los otros dos calendarios. Los "[]" significan que cfq está siendo utilizado. No estoy muy seguro de la diferencia entre noop y deadline pero cualquiera de los dos está bien.

De nuevo desde el terminal:

sudo nano /etc/rc.local

Vamos a aumentar estas dos líneas antes del "exit 0" del archivo. Después de los comentarios que comienzan con # el archivo debe verse así. Así mismo si su SSD está en sdb, sdc... deberán cambiar el código.

echo deadline > /sys/block/sda/queue/scheduler
echo 1 > /sys/block/sda/queue/iosched/fifo_batch


exit 0

Si quieren intentar usar noop en vez de deadline solo deben cambiar la primera línea escribiendo noop en vez de deadline justamente.

Aquí hay una página en inglés donde además de explicar todos los cambios hechos aquí hacen algunos tests para ver cómo influyen los cambios hechos: Tests SSD (inglés)

Ahora lo unico que tienen que hacer es resetear su computador y voilà!